:syn-flood - [0:0]
iptables
Submitted by admin on 2017, May 16, 12:26 PM
开源直播与监控系统
Submitted by admin on 2017, May 15, 11:20 AM
go get 获得 golang.org 的项目
Submitted by admin on 2017, May 12, 12:51 AM
go get 用来动态获取远程代码包的,目前支持的有BitBucket、GitHub、Google Code和Launchpad。这个命令在内部实际上分成了两步操作:第一步是下载源码包,第二步是执行go install。下载源码包的go工具会自动根据不同的域名调用不同的源码工具,对应关系如下:
BitBucket (Mercurial Git)
GitHub (Git)
Google Code Project Hosting (Git, Mercurial, Subversion)
Launchpad (Bazaar)
go get 的参数说明:
-d 只下载不安装
-f 只有在你包含了-u参数的时候才有效,不让-u去验证import中的每一个都已经获取了,这对于本地fork的包特别有用
-fix 在获取源码之后先运行fix,然后再去做其他的事情
-t 同时也下载需要为运行测试所需要的包
-u 强制使用网络去更新包和它的依赖包
-v 显示执行的命令
注意,这里的 –v 参数对我们分析问题很有帮助。
参考:https://github.com/astaxie/build-web-application-with-golang/blob/master/zh/01.3.md
国内由于墙,我们会收到 unrecognized import path 的错误,这时候我们如何通过命令行来执行 go get 呢?
这时我们会获得类似如下错误:
go get -u -v golang.org/x/oauth2
Fetching https://golang.org/x/oauth2?go-get=1
https fetch failed.
import "golang.org/x/oauth2": https fetch: Get https://golang.org/x/oauth2?go-get=1: dial tcp 216.58.221.145:443: i/o timeout
package golang.org/x/oauth2: unrecognized import path "golang.org/x/oauth2"
localhost:~ ghj1976$
如果目录下有以前的版本,则是如下情况:
go get -u -v golang.org/x/oauth2
Fetching https://golang.org/x/oauth2?go-get=1
https fetch failed.
import "golang.org/x/oauth2": https fetch: Get https://golang.org/x/oauth2?go-get=1: dial tcp 216.58.221.145:443: i/o timeout
golang.org/x/oauth2 (download)
Fetching https://golang.org/x/net/context?go-get=1
https fetch failed.
import "golang.org/x/net/context": https fetch: Get https://golang.org/x/net/context?go-get=1: dial tcp 216.58.221.145:443: i/o timeout
golang.org/x/net (download)
Fetching https://golang.org/x/oauth2/internal?go-get=1
https fetch failed.
import "golang.org/x/oauth2/internal": https fetch: Get https://golang.org/x/oauth2/internal?go-get=1: dial tcp 216.58.221.145:443: i/o timeout
golang.org/x/net/context
golang.org/x/oauth2/internal
golang.org/x/oauth2
localhost:~ ghj1976$
这时候我们需要设置代理。代理工具我推荐用 lantern https://github.com/getlantern/lantern
需要注意的是,它的代理地址是: http://127.0.0.1:8787 而不是 http://127.0.0.1:16823/ ,后一个是它的配置网站地址。
以mac为例, 在命令行 Terminal 中设置网络代理,一般方法如下:
root@ed27c545f7af:~# cat ~/proxy.conf export http_proxy=http://172.17.42.1:8118 export https_proxy=$http_proxy export ftp_proxy=$http_proxy export rsync_proxy=$http_proxy export no_proxy="localhost,127.0.0.1,localaddress,.localdomain.com"参考:https://github.com/tools/godep/issues/154
win下 用 set 代理 export ,参考 https://groups.google.com/forum/#!topic/lantern-users-zh/FiywFrEHSHE
删除环境变量用
删除:unset 变量名 参考 http://blog.csdn.net/debug_cpp/article/details/2679991
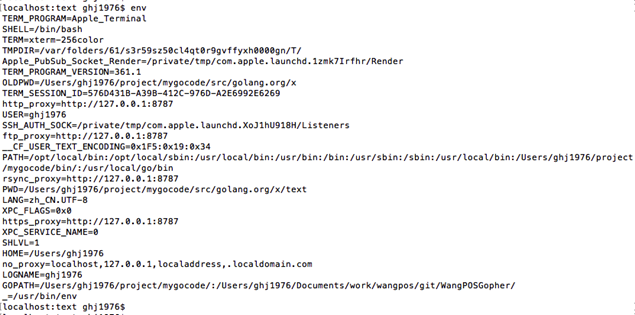
当前系统上下文的环境设置可以用 env 命令查看。
https://code.google.com/p/go/issues/detail?id=2919
这步代理设置后,我们可以用 wget 命令去试验效果。参考: https://github.com/getlantern/lantern/issues/3341
另外,go get 使用的 git 、mercurial、svn 设置代理的方法请参考:
https://github.com/golang/go/wiki/GoGetProxyConfig
以我们最常用的 git 为例,
在终端设置:
git config --global http.proxy http://127.0.0.1:1080
git config --global https.proxy https://127.0.0.1:1080
默认不设置代理:
git config --global --unset http.proxy
git config --global --unset https.proxy
查看已经设置的值:
git config http.proxy
参考: http://blog.csdn.net/dengbin9009/article/details/38058153
配置完成后,以下载 golang.org/x/net 为例,执行的返回值如下:
go get -u -v golang.org/x/net
Fetching https://golang.org/x/net?go-get=1
Parsing meta tags from https://golang.org/x/net?go-get=1 (status code 200)
get "golang.org/x/net": found meta tag main.metaImport{Prefix:"golang.org/x/net", VCS:"git", RepoRoot:"https://go.googlesource.com/net"} athttps://golang.org/x/net?go-get=1
golang.org/x/net (download)
package golang.org/x/net: no buildable Go source files in /Users/ghj1976/project/mygocode/src/golang.org/x/net
localhost:text ghj1976$
我们可以看到其实是到 https://go.googlesource.com/text/ 这样的地址去下载源码的。中间涉及到跳转和git下载,所以 要注意, 网络请求的 http_proxy 和 git 的 代理 都需要设置才可以。
-----------------
命令行设置代理,确保可以下载的命令如下:
export http_proxy=http://127.0.0.1:8787
git config --global http.proxy http://127.0.0.1:8787
git config --global https.proxy https://127.0.0.1:8787
--------
go get -u golang.org/x/mobile
取消设置
unset http_proxy
git config --global --unset http.proxy
git config --global --unset https.proxy
------------
查看设置的变量
echo $http_proxy
git config http.proxy
git config https.proxy
go get使用代理
Submitted by admin on 2017, May 12, 12:35 AM
git config –global http.proxy “127.0.0.1:8087”
go get …
或者可以在go get的同时指定代理:
http_proxy=127.0.0.1:8087 go get
------------------------------------
我的FQ方式(也可以使用别的方式):
使用 ishadowsocks 方式FQ
临时设置Windows下代理:
在控制台执行如下命令,后面的的代理值根据你具体的代理进行设置
set http_proxy=http://127.0.0.1:1080/pac?t=201603231602138322 set https_proxy=https://127.0.0.1:1080/pac?t=201603231602138322
临时设置Linux下代理:
在控制台执行如下命令,后面的的代理值根据你具体的代理进行设置
http_proxy=http://127.0.0.1:1080/pac?t=201603231602138322 https_proxy=https://127.0.0.1:1080/pac?t=201603231602138322
此时,在控制台执行 go get 时即自动会通过代理。
mysql强制修改密码
Submitted by admin on 2017, May 11, 5:10 PM
mysqld_safe --skip-grant-tables --socket=/tmp/mysql.sock > /dev/null 2>&1 &
使用Docker Compose管理多个容器
Submitted by admin on 2017, May 10, 9:28 AM
Docker Compose是一个用来定义和运行复杂应用的Docker工具。使用Compose,你可以在一个文件中定义一个多容器应用,然后使用一条命令来启动你的应用,完成一切准备工作。一个使用Docker容器的应用,通常由多个容器组成。使用Docker Compose,不再需要使用shell脚本来启动容器。在配置文件中,所有的容器通过
- github.com/docker/compose
services来定义,然后使用docker-compose脚本来启动,停止和重启应用,和应用中的服务以及所有依赖服务的容器。完整的命令列表如下:参考 https://docs.docker.com/compose/install/ 。你能运行Compose在OSX和64位Linux。当前不支持Windows操作系统。build构建或重建服务
help命令帮助
kill杀掉容器
logs显示容器的输出内容
port打印绑定的开放端口
ps显示容器
pull拉取服务镜像
restart重启服务
rm删除停止的容器
run运行一个一次性命令
scale设置服务的容器数目
start开启服务
stop停止服务
up创建并启动容器
8.1. 安装Docker Compose
8.2. 配置文件
1.Compose的配置文件是docker-compose.yml。让我们看看下面这个文件:这个文件在 https://raw.githubusercontent. ... dees/ ,它表明:
a. 定义了两个服务分别叫做
mysqldb和mywildfyb. 使用
image定义每个服务的镜像名c. MySQL容器的环境变量定义在
environmentd. MySQL容器使用
links和WildFly容器链接e. 使用
ports实现端口转发8.3. 启动服务
1.如果你从互联网运行,将docker-compose-internet.yml保存为docker-compose.yml。2.如果你使用教师给的镜像,将
docker-compose-instructor.yml保存为docker-compose.yml。3.使用下面的命令,所有的服务将使用后台模式被启动
显示的输出如下:
Creating attendees_mysqldb_1... Creating attendees_mywildfly_1...使用
-f指定代替的compose文件。使用
-p指定代替compose文件所在的目录。4.验证启动的服务
这里提供了一个整合的列表显示所有启动的服务和容器。
同时,通常使用
docker ps命令来验证应用的容器,和在Docker主机上运行的其他容器。运行yum报错:No module named yum
Submitted by admin on 2017, May 2, 9:33 PM
一、升级或卸载Python导致:
|
1
2
3
4
5
6
7
8
|
1、查看已安装python的版本,可能是当前系统存在多个python导致[root@test ~]# whereis pythonpython: /usr/bin/python2.6 /usr/bin/python /usr/bin/python2.6-config /usr/lib/python2.6 /usr/lib64/python2.6 /usr/include/python2.6 /usr/share/man/man1/python.1.gz[root@test ~]# vi /usr/bin/yum将 #!/usr/bin/python 修改为 #!/usr/bin/python2.6如果是源代码安装的,默认路径是/usr/local/bin/python2.6,做个软链接即可rm -rf /usr/bin/pythonln -s /usr/local/bin/python2.6 /usr/bin/python |
|
1
2
3
4
5
6
7
8
9
10
11
12
13
14
15
16
17
18
19
20
21
22
23
24
25
26
27
|
1、删除现有Python[root@test ~]# rpm -qa|grep python|xargs rpm -ev --allmatches --nodeps ##强制删除已安装程序及其关联[root@test ~]# whereis python |xargs rm -frv ##删除所有残余文件 ##xargs,允许你对输出执行其他某些命令[root@test ~]# whereis python ##验证删除,返回无结果2、删除现有的yum[root@test ~]# rpm -qa|grep yum|xargs rpm -ev --allmatches --nodeps[root@test ~]# whereis yum |xargs rm -frv3、从http://mirrors.ustc.edu.cn/centos/6.4/os/x86_64/Packages/下载相应的包python-2.6.6-36.el6.x86_64.rpmpython-devel-2.6.6-36.el6.x86_64.rpmpython-libs-2.6.6-36.el6.x86_64.rpmpython-pycurl-7.19.0-8.el6.x86_64.rpmpython-setuptools-0.6.10-3.el6.noarch.rpmpython-urlgrabber-3.9.1-8.el6.noarch.rpm python-iniparse-0.3.1-2.1.el6.noarch.rpmrpm-python-4.8.0-32.el6.x86_64.rpmyum-3.2.29-40.el6.centos.noarch.rpmyum-metadata-parser-1.1.2-16.el6.x86_64.rpmyum-utils-1.1.30-14.el6.noarch.rpmyum-plugin-fastestmirror-1.1.30-14.el6.noarch.rpm yum-plugin-protectbase-1.1.30-14.el6.noarch.rpmyum-plugin-aliases-1.1.30-14.el6.noarch.rpmyum-plugin-downloadonly-1.1.30-14.el6.noarch.rpm由于源中版本会更新,具体请查看URL中的版本再下载下来![root@test ~]# rpm -Uvh --replacepkgs python*.rpm[root@test ~]# rpm -Uvh --replacepkgs rpm-python*.rpm yum*.rpm可能之间还需要zlib和zlib-devel包,根据情况下载并安装! |
|
1
2
3
4
5
6
7
|
[root@test ~]# pythonPython 2.6.6 (r266:84292, Feb 22 2013, 00:00:18)[GCC 4.4.7 20120313 (Red Hat 4.4.7-3)] on linux2Type "help", "copyright", "credits" or "license" for more information.>>> import yum>>>如上,要是什么都没报,则说明OK啦~ |
重新安装当前系统的所有RPM包修复系统.
rpm -qa|xargs yum reinstall -y
apache ssl
Submitted by admin on 2017, April 30, 12:40 PM
sed -i 's@^#Include conf/extra/httpd-ssl@Include conf/extra/httpd-ssl@' /www/wdlinux/apache/conf/httpd.conf
1,强制主站所有Web使用(全局站点)
如果要强制主站使用HTTPS,我们可以这样修改httpd配置文件:
# vim /etc/httpd/conf/httpd.conf
ServerName www.example.com:80
Redirect permanent / https://www.example.com
2,强制虚拟主机(单个站点)
如果要强制单个站点在虚拟主机上使用HTTPS,对于HTTP可以按照下面进行配置:
# vim /etc/httpd/conf/httpd.conf
<VirtualHost *:80>
ServerName proxy.mimvp.com
Redirect permanent / https://proxy.mimvp.com/
</VirtualHost>
强制Apache使用HTTPS
如果你想让你的用户访问你的webapp时只使用安全的HTTPS协议,而不是没加密过的HTTP协议,可以这样配置Apache:
在<Virtualhost *:80>里面加入如下内容:
RewriteEngine On
RewriteRule ^(.*)$ https://%{HTTP_HOST}$1 [R,L]
然后重启Apache, done!

